Editor’s note: Today’s guest blogger is Paul Kogan, CEO of Hovee. Read how Hovee is using Google Maps APIs to transform commuting by matching drivers with one another. ...


Editor’s note: Today’s guest blogger is Paul Kogan, CEO of Hovee. Read how Hovee is using Google Maps APIs to transform commuting by matching drivers with one another.


At Hovee, we are reinventing the carpool by combining it with the power of social networking. We’ve built our company around the concept of “social commuting” — the idea that more people will carpool if they can choose who shares their drives based on routes and personal interests.


Our platform matches commuters with each other to find the most efficient carpools for everyone. We use Google Maps APIs to calculate and plot routes and drop-off points, displaying them in our web and iOS apps. Since about 70 percent of our user base is iPhone users, we decided to focus on delivering the iOS app first. We plan to add the Hovee Android app this summer.


After users download the app, they create personal profiles which we use to match people based on compatibility, for example, whether they prefer to listen to the radio or chat during their commute. Users enter their home and work locations, and we use the Geocoding API to validate addresses. The Geocoding API has been hugely effective and is more accurate than our previous mapping service, Apple Maps. We switched to Google Maps for more accurate geo-coordinates and the ease of getting waypoints and plotting polylines.


Hovee_Commute_Details.png


Once profiles are complete, we generate a RideMatch list for each user. It shows their optimum commuting partners, sorted by an algorithmic score which combines route calculations, schedule and social components. To enable this feature, two Google Maps APIs come into play: the Directions API and the Distance Matrix API. The Directions API identifies the routes while the Distance Matrix API estimates driving time and distance. We then plot pickup and drop-off points using the Javascript API for the web client, and the Google Maps SDK for iOS for the iOS app.


Hovee_RideMatch.png Hovee_iOS_Map.png


When commuters browse the profiles of possible ride partners, we obscure their home and work addresses for privacy reasons.


We now have several hundred people from a dozen companies in the San Francisco Bay Area participating in our pilot program. We’re currently working to bring Hovee to all Bay Area commuters. This summer we plan to expand the service to the Washington D.C metro area.


Setting up carpools can be a complex interaction. But with the power of the Google Maps APIs, our users can now do this in a way that’s responsive, intuitive and social.


Editor’s note: Today’s guest blogger is Robert James Reese, executive producer for Runner's World Online. Read how Runner’s World’s 40 Million Steps website used Google Maps APIs to build a virtual tour of an around-the-world run. ...


Editor’s note: Today’s guest blogger is Robert James Reese, executive producer for Runner's World Online. Read how Runner’s World’s 40 Million Steps website used Google Maps APIs to build a virtual tour of an around-the-world run.


The journey of one runner's trek around the globe is an amazing feat, and at Runner’s World we wanted people to share in the experience. To do this, we created the 40 Million Steps website, which allows people to relive Tom Denniss’ record-breaking, 622-day, world-spanning run.


The site uses Google Maps APIs to allow people to relive Denniss’ 16,300-mile run. Using Satellite View, users can click on the map to see the thousands of photos and nearly 400 videos captured during Denniss’ journey, making it feel as if they were there.


Our online launch coincided with a feature we ran in our April 2015 print issue, so we wanted the online version to have some of the same look and feel to create a cohesive connection between print and online. The styling for the map itself is all specified through the styles property of the MapOptions object in our JavaScript.


RunnersWorldScreenshot.png
Users view Day 1 of the run and are able to click through his progress.


We used the Geocoding API and the Elevation API as editorial tools. The Geocoding API helped us to fact-check location names, and we used the Elevation API to find out and highlight interesting facts about the run, such as its lowest and highest points.


The Javascript API was key in building the site. We faced a real challenge because of the amount of data we had from the run, on which Denniss wore a GPS-enabled watch to record his locations. Typically, when creating a polyline with the Google Maps API, we would have just included a "new google.maps.LatLng" on a separate line for each point, as shown in the documentation on Google’s developer site. However, since we were dealing with over 3 million GPS data points, it was too many for the browser to handle, so we simplified the polyline before sending the points to the browser by sampling every 20th data point.


We set out to build the site to impress our audience and give them something really cool that they hadn’t seen before. There’s arguably no better way to experience the joy, pain, exhaustion and exhilaration that Denniss felt during his run around the world—and Google Maps APIs were key to bringing his adventure to life.


Editor’s note: ‘Map Tips’ are designed to answer frequently asked questions about Google Maps APIs. For important tips on how to deploy Google’s mapping tools, read more from David McClusky, Google Maps Solutions Architect at Google. ...


Editor’s note: ‘Map Tips’ are designed to answer frequently asked questions about Google Maps APIs. For important tips on how to deploy Google’s mapping tools, read more from David McClusky, Google Maps Solutions Architect at Google.


One of the most familiar features of Google Maps is autocomplete, Google’s ‘type ahead’ functionality. Autocomplete reduces errors in entries and provides a better search experience for the user. This functionality is included in both our web and mobile Google Places API libraries, however many developers tend to overlook it when building their own mapping applications.


You can greatly enhance your application’s user experience by providing Autocomplete functionality for both address input, points of interest, and search terms. The Google Places Autocomplete API is available in the Places Javascript API, as a web service, in the Places API for Android, and coming soon in the Places API for iOS.


Here are some easy steps to help you get started with Autocomplete on your website, using the Javascript version of the Places API.


Step 1 - You need to specifically include the Places library when loading the Google Maps Javascript API. To do this, you will need to load the Google Places library using the libraries parameter in the bootstrap URL for the Google Maps JavaScript API. Be sure to replace API_KEY in the example with your Maps API key.


<script type="text/javascript"
src="https://maps.googleapis.com/maps/api/js?libraries=places&key=API_KEY">
</script>


Step 2 - Create a text box on your page for the user’s input. After you have a text box, you start the autocomplete service and attach it to that text box. You can set a variety of options, such as restricting the results to cities only, as in this example.


HTML:

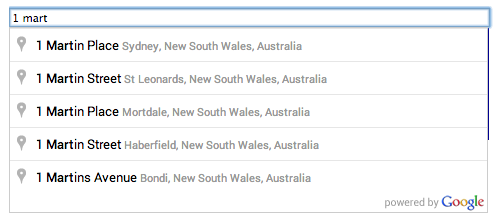
<input id="search" type="text">


JavaScript:

var autoComplete = new google.maps.places.Autocomplete(   
document.getElementById(search), {
types: ['(cities)']
});

Step 3 - Add an event listener to the text box that fires when a result is selected. You can then handle the results. In this example, we pan and zoom the map to the location entered by the user.


JavaScript:

google.maps.event.addListener(autoComplete, 'place_changed', function() {
var place = autocomplete.getPlace();
 if (place.geometry) {
  map.panTo(place.geometry.location);
    map.setZoom(15);
 }
});

That’s all there is to it.


Tips for Improving the Autocomplete Experience

There are many additional features to make Autocomplete an even better experience on your website. Here are some tips to make the most out of autocomplete:


  • Improve the experience by biasing the results to a particular geographic area, such as the map viewport, or restricting the search to a particular country. This will insure that the results most relevant to your users are surfaced first.

  • You can style the autocomplete results by defining your own custom styles, to match the look and theme of your website. View the styling documentation here.

  • Combine with other Places API features, such as Nearby Search, to provide an all-in-one local search experience, complete with nearby point of interest listings and business photos.

  • Need to call Autocomplete from a server? Use the Google Places Autocomplete web service.

  • Want to autocomplete on search terms, rather than just place names? Use the Query Autocomplete web service or Javascript SearchBox.


Building a mobile app?

The Google Places API for Android can provide a great Autocomplete experience for address entry in your mobile application. Take a look at the developer documentation as well as a complete sample application on GitHub.


Get Started

We hope you’re able to incorporate the Autocomplete capabilities into your website or mobile application. Get started with Autocomplete today by visiting the following resources:


Posted by David McClusky, Google Maps Solutions Architect


    Editor's note: Today’s guest blogger is Scott Hemmeter, CEO and founder of Arrowpointe, a company that creates applications for Salesforce customers. See how Arrowpointe and other developers are using the Google Maps APIs to bring maps and location content to their users. ...


    Editor's note: Today’s guest blogger is Scott Hemmeter, CEO and founder of Arrowpointe, a company that creates applications for Salesforce customers. See how Arrowpointe and other developers are using the Google Maps APIs to bring maps and location content to their users.


    Maps and data go well together, and we’ve built our business on that premise. We developed an application called Geopointe to help companies map their Salesforce.com database to visualize location information, gain spatial insights and boost productivity—directly from within Salesforce. For example, a salesperson on the road can connect to the application on her mobile device and view, on a Google Map, all of her highly rated accounts in Salesforce that are within a 30-mile radius of where she’s standing. She can then get directions between these locations to plan her meetings and make most efficient use of her time.


    Geopointe adds a map tab to Salesforce and uses Google Maps as the interface into Salesforce data. Our pages, both web and mobile, are HTML5 based, served by Salesforce’s Visualforce technology and heavily use client-side JavaScript to provide the user experience. The Google Maps JavaScript API is used to interact with the map.


    The flexibility of the Google Maps API enables our users to pull in data from other sources in the KML format and then layer it on the screen. For example, we have an agricultural customer who uses it to pull in drought information. If they’re working with farmers in Arizona, they can see the conditions in any location in the state.


    We also use the drawing tools in the Google Maps APIs to build a shape library that makes the app more useful within specific geographic areas. Users can define a space on their map, then pull information within the confines of that particular area. We collect data — like the boundaries of San Francisco neighborhoods — and host it ourselves in the GeoJSON format. We built an API to get GeoJSON data to Geopointe, which then uses the Google Maps APIs to put it on the map.


    We chose Google Maps because business users rely on it. They want Google’s directions, Street View and Satellite View. Data is a valuable resource for Salesforce customers, and Google Maps is a great way to provide it. Google Maps lets our customers visualize data to make better use of it in their day to day operations. It’s one thing to see information in a list, report or sorting table, but once someone sees data pictured on a map, they say, “Now I know what I need to do.”


    Editor’s Note: ‘Map Tips’ are designed to answer frequently asked questions about using Google Maps APIs. For important tips on how to deploy Google’s mapping tools, read more from Brad Songer, Google Maps Program Manager. ...


    Editor’s Note: ‘Map Tips’ are designed to answer frequently asked questions about using Google Maps APIs. For important tips on how to deploy Google’s mapping tools, read more from Brad Songer, Google Maps Program Manager.


    We find that when developers are migrating their applications from their development environment to production, many are moving from using our free Maps APIs to Google Maps APIs for Work. Google Maps APIs for Work are covered by the premium Service Level Agreement which includes higher quota limits and access to premium/live support channels. Here are some important tips to help you get started with our premium products.


    Implementing your Client ID

    Your unique Client ID comes with the Google Maps APIs Welcome Letter. The Welcome Letter is typically sent to your technical contact. If you did not receive your welcome letter, you can also visit the Google for Work Support Portal, which will provide you with your Client ID.


    Your Client ID is how Google identifies you—and your application—as a licensed customer entitled to a premium Service Level Agreement from Google.


    There are only a few, simple steps to make sure your application is leveraging these advantages as it moves into production. Essentially, your Client ID will replace the Project Key previously used in the applications API calls to Google’s servers while in development. The example below illustrates the before-and-after scenario using the Client ID, ‘gme-droidsdonuts'.


    The v parameter specifies the version of the API to load. As a Maps For Work customer you should always use the release version, which you can load by specifying v=3.  Check the versioning guide for more information.


    Chrome Developer Tools make it easy to visually review your application's HTML to check that your Client ID is deployed, or that you haven’t missed replacing any Project Keys in API calls. The Google for Work Support Portal provides another great reference by displaying a record of pageviews and web service calls made by your Client ID. Between Chrome Developer Tools and the Google for Work Support Portal, you have two great ways to verify your application is launching with a premium SLA.


    Authorizing Domains

    To protect your projects and applications, Google will always validate your API calls to ensure only authorized domains are using your Client ID. Any API calls from an unauthorized domain will return an error and not count against your quota.


    You can review authorized domains (e.g. yourbiz.com), and authorize additional domains (e.g. yourpartnerbiz.com) at any time through the Google for Work Support Portal. If you run into authorization problems, check out our troubleshooting guidelines or contact support for help.


    FDc9njsgOw.png

    Authenticating Web Service Requests with a Crypto Key

    In addition to your Client ID, calls to Google Maps Web Service APIs (Geocoding, Directions, Distance Matrix, Elevation, Time Zone, and Roads) require an extra layer of authorization with a cryptographic signing key. The ‘crypto key’ ensures that Web Service API request that include your Client ID and an authorized domain, in fact, are originating from a trusted source.


    Keep in mind the crypto key alone is not a signature, but simply generates signatures. Like a password, it should never be shared or left in a vulnerable area where it can be copied. To learn more, please visit the Authentication and Authorization page.


    You’re All Set

    Now that you've deployed your Client ID, set-up authorized domains, and you’re generating unique signatures using your crypto key, you're ready to launch your app with increased quotas, the confidence of a business friendly SLA and support. If you have more questions, take a look at our developer documentation, where you’ll find product-related FAQs, articles and other resources.


    If you hit a technical snag with our APIs, please file a case with our live support team. We’ll address your deployment problem as quickly as possible. For a step-by-step tutorial on replacing your project key with your Client ID, take a look at our video.


    Editor's Note: Joshua Lau studies Computer Science and Mathematics at the University of New South Wales, Australia. He has spent the past summer interning on the Google Maps JavaScript API v3 team in Sydney. He’s had lots of fun enabling users to edit, drag and create Data layer Features on Maps. ...


    Editor's Note: Joshua Lau studies Computer Science and Mathematics at the University of New South Wales, Australia. He has spent the past summer interning on the Google Maps JavaScript API v3 team in Sydney. He’s had lots of fun enabling users to edit, drag and create Data layer Features on Maps.


    Today we’re introducing new features to the Data Layer that will make it easy for you to allow users to input and edit geographic data and get the updated data in GeoJSON format. Geographical data make maps interesting, informative and useful for users. For example, interactive Data Layers can be used to gather user opinions on the best places to visit and easily build heatmaps based on popular hotspots by using a Styling Function on the Data Layer. Or perhaps you could build a real estate site that allow users to draw Polygons to describe the areas that they do and don’t want to live in. The possibilities are endless.


    Previously, we introduced Data Layers in the JavaScript Maps API v3, enabling you to visualize custom geographical data features on your maps and style them based on their attributes. You could also import and export data onto Data Layers in the popular GeoJSON format. For details, see the Developer’s Guide to the Data Layer.


    Graphically Edit a Data Layer

    You can allow users to edit a Data Layer by setting the draggable and editable styling options. Using the existing toGeoJson() method, you’ll also be able to easily extract the updated Data Layer in GeoJSON format.


    Users can also draw new Points, LineStrings and Polygons. You can enable this behaviour by specifying a list of drawing controls. See editing and drawing in action below.


    map.data.setStyle({draggable: true, editable: true});

    map.data.setControls(['Point', 'LineString', 'Polygon']);


    data layer drawing.png
    Editing a polygon

    Use the Simple GeoJSON Editor

    To showcase these new features, we’ve built a Simple GeoJSON Editor that lets users import GeoJSON via drag and drop, edit it, and export. Play with it, and take a look at the source to see how it’s done.


    GeoJSON editor.png
    Adding some extra points using the app


    Display Geodesics in the Data Layer

    As an added bonus, we’re also rolling out the ability to display Line String and Polygon geometries geodesically (their edges follow the curvature of the Earth). This can be enabled by setting the geodesic styling option on the respective Data Layer.


    geodesic.png
    The shortest route from San Francisco to London is via Greenland


    If you’d like to know more, head over to our API Reference. We’d love to hear about the exciting new apps you’re building with the new features in the Data layer. Feel free to share them in the comments below. Have fun!


    Editor’s note: Today’s guest blogger is Adam Ratana, developer of Sun Surveyor. Read how Sun Surveyor is using Google Maps APIs to help photographers capture the perfect photo.


    I’m a photography enthusiast, and I’m always looking for ways to improve my work. That’s what led me to develop ...

    Posted by Adam Ratana, developer of Sun Surveyor


    Editor’s note: Today’s guest blogger is Adam Ratana, developer of Sun Surveyor. Read how Sun Surveyor is using Google Maps APIs to help photographers capture the perfect photo.


    I’m a photography enthusiast, and I’m always looking for ways to improve my work. That’s what led me to develop Sun Surveyor, an iOS and Android app that uses Google Maps APIs to visualize the location of the sun and the moon anywhere in the world. The app makes it easy to figure out when the natural lighting will be just right — and get the ideal shot.


    Sun Surveyor uses augmented reality to overlay the paths of the sun and moon on a camera’s view, so you can see where in the sky they’ll be at a specific time and place. Photographers can use it to plan their shots ahead of time, and businesses can use it to gauge things like how best to align solar panels to make the most efficient use of the angle of the sun.


    The app uses multiple Google Maps APIs, including the Elevation API, the Time Zone API, the Google Maps SDK for iOS and the Google Maps Android API. The Android API, which includes Street View, was particularly helpful. It allowed me to overlay the path of the sun and moon on any Street View location anywhere in the world. For programming details, see this blog post.


    The following screen captures give you a sense of how the app works. They show overlays on top of the iconic Half Dome in Yosemite National Park. The first shows the paths of the sun (yellow line) and moon (blue line) over an aerial view of Yosemite Valley. The green line shows the distance between the photographer and the object to be photographed — in this case, Half Dome.


    This next screen capture shows how the app looks when in Street View mode. Again, the yellow line shows the sun’s path, and the blue line shows the moon’s path. The green line represents the horizon. You can see how the app lets you plan the right time to get a shot of the sun behind Half Dome: in this particular instance, 8:06 am.


    Nearly 500,000 people around the world have downloaded the free version of Sun Surveyor, and many have paid for the full edition. They’re taking remarkable photos as a result, and what started as a hobby for me has turned into a business — thanks to Google Maps APIs.


    Editor’s Note: ‘Map Tips’ are designed to answer frequently asked questions about using Google Maps APIs. For important tips on how to deploy Google’s mapping tools, read more from David McClusky, Solutions Architect at Google. ...


    Editor’s Note: ‘Map Tips’ are designed to answer frequently asked questions about using Google Maps APIs. For important tips on how to deploy Google’s mapping tools, read more from David McClusky, Solutions Architect at Google.


    Since the launch of Google Maps APIs, developers have built useful maps to help consumers find nearby stores. Almost ten years later, store locators continue to be a primary use case for our mapping tools, but we think there’s even more developers can do with our APIs.


    Here are seven helpful tips for building a beautiful, user-friendly store locator for your customers:


    1. Use Autocomplete for address entry. Autocomplete is a feature of the Places library in the Google Maps JavaScript API. You can use autocomplete to give your applications the type-ahead-search behavior of the Google Maps search field. When a user starts typing an address, autocomplete will fill in the rest. The Google Places API provides a search box widget with this functionality so there’s no need to parse inaccurate user entries.


    2. Provide a ‘Signed-in’ experience. With Attributed Save, your visitors can save your store locations to view on other maps throughout the web, such as maps.google.com, and link back to your site when selected. When you enable sign-in with the Google Maps JavaScript API, your users will have a map tailored to them which means their saved locations (e.g. home and work) will show also on your map.


    3. Automatically locate your customers using HTML5 Geolocation. When a user arrives at a store locator page, they typically want to find a store as quickly as possible. HTML5 Geolocation gives you the ability to immediately identify the location of the user and automatically present the nearest store locations within her area. Making store location as efficient and simple as possible means customers can find what they are looking for quickly and ultimately arrive at one of your stores sooner.


    A great example of Geolocation is the 'Find FedEx Locations' on the FedEx website. The closest store locations are automatically displayed when the user starts searching for a FedEx location near them.


    4. Provide a Street View image of your store exterior. Using the Google Street View Image API, you can help guide customers to your door by providing an image of your storefront and adjacent area. The Walgreens App has integrated Google Street View with its Store Locator feature, making it easier than ever for Walgreens customers to get in, get out and get on with their day. With the updated Store Locator feature, customers can easily find a Walgreens, access store details and view the store location up close.


    5. Sort results by actual driving distance. Typically, store locator databases will provide an ‘as the crow flies’ distance when performing a spatial search. In some instances this can be misleading. After performing your database search, you can re-sort the results using the Distance Matrix Service to obtain actual driving distances. In addition, you can provide the actual driving or transit directions right on your map using the Directions Service, so customers do not need to leave your application.


    6. Use a large, stylized map as the focus of your application. People think visually and spatially, so a stylized map should be the focus point of your store locator. To improve the effectiveness of your map visualization, consider using dynamic elements such as automatically highlighting markers of selected stores, or setting the zoom level automatically to capture all your markers. You can also use styled maps to customize the presentation of the standard Google base maps to align with your store brand or visuals.


    When a user selects 'Find Us' on the Tesla website, the first thing he sees is a large map automatically displaying all Tesla locations in his area.


    7. Let the map drive the search experience. Allow your users to find additional store locations as they navigate the map. Introduce an event listener on the map idle event to fetch stores whenever the user pans or zooms the map around. This creates a more interactive and engaging experience for the user by not requiring text input to refine their search.


    To get started quickly with some sample code, take a look at the Store Locator Library for the Google Maps API, which includes a fully-implemented store locator example with many of the above features included.


    We hope you’re able to incorporate some of these store locator tips into your customer experience. Learn more about what Google Maps APIs can do for websites and applications.